
Important: Please make sure the sensor mat is working correctly before setting up the Vertical Launch Camera!
Applies to Firefly MV machine vision camera only.
Before you start make sure the camera is positioned correctly approx 7' from the ball on either the left or right side of your setup.

1] Enable the Video Capture in the ProTee Golf Interface.
- Goto Settings -> Options and set the Video Capture to Yes.
- Save the settings, exit and restart the ProTee Golf Interface.
2] Configure and test the Vertical Camera (V Cam).
- Goto Settings -> Options -> V Cam.
- Select the Camera you want to assign as Vertical Camera from the Camera dropdown box.
- If the camera drivers are installed correctly and the camera is plugged in you will find the Firefly MV camera in the list.
- Select the Iron 7 from the Club selection Listbox.
- Click the Preview button.
The preview window will show the camera image from the selected camera.
- Click the Camera Devices button to open the camera configuration screen.
- Lower the camera framerate to approx. 40 fps.
- Apply the settings and close the configuration screen.
- Click the Preview button to show the preview with the new settings.
Note: By default the camera is in 320x240 format7 mode which will work fine in most situation. You can use the camera in 640x480 resolution. For this you need to edit the settings.pgs file from the ProTee Golf Interface and restart the interface. Find and change the following setting values:
- Video_frame_rate=60
- Video_width= 640
- Video_height= 480
3] Position the camera and place the ball
- Place the ball on the tee position.
- Position the camera so the ball is in the red box of the Preview image.
- Position the camera so the red line on the bottom is hortizontal with the floor.
- Make sure the the hitting direction is to the right. The impact screen can appear just inside the camera view on the right side. You can filter this out with the Right exclusion slider later.
You can now make a test shot with an Iron 7.
The Captures on the bottom of the screen will show 8 video frames of captured images.
Use the Horizontal scrollbar to scroll through the captured images.
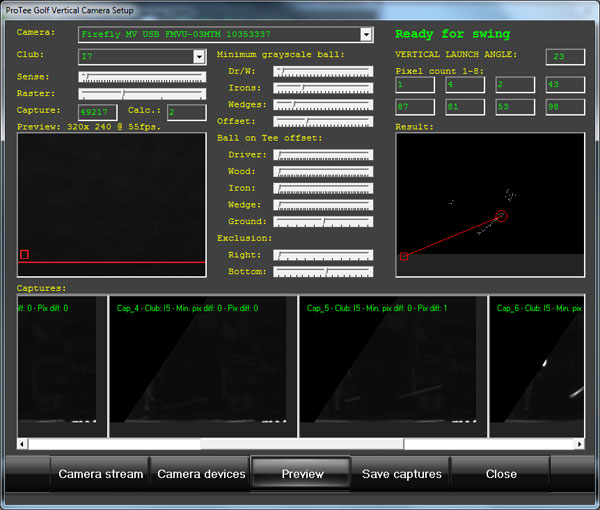
This example shows a capture of the ball streak under very bad lighting conditions. Without configuration the result showing the Result window will be off. In this case it has captured the club head and not the ball. On this example the actual ball streak can be found on capture 4 and 5.
- Set the Raster Slider as low as possible (value = 1).
- Set the Sense slider as low as possible (value = 5).
- Set the Dr/W, Irons and Wedges sliders as low as possible (value = 5).
- Set the Offset slider as high as possible (value = 255).
- While the captures are still there right mouse click on the Result window.
- From the right click menu select: (Re)analyse.
When the captures have changed or disappeared you will need to make another test shot.
Tip: When you have made a test shot you can click the Save captures button. This will store the captured images on your Desktop in a folder called PT_Capture. When you right mouse click one of the image boxes on the bottom you can reload these images by selecting 1 out of the captured sequence.
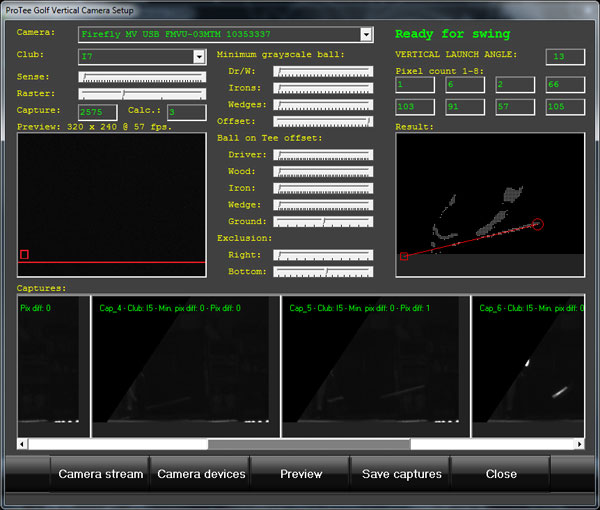
This example shows the analysis in the Result screen, which makes already a lot more sense.
When moving the mouse over one of the captures on the bottom you can see the greyscale color next to the crosshair mouse pointer. Using this information you can find the average greyscale color values that represent the ball streak. In the example we found the greyscale colors of the streak to be somewhere between 25 and 40.
- With the Sense slider (sensitivity) you can filter out unwanted detections like camera noise and other moving objects. Its important that the Sensitivity slider is set to a value that filters out unwanted camera noise, but still shows a nice ball streak. Do a (Re)analyse to see the new Result.
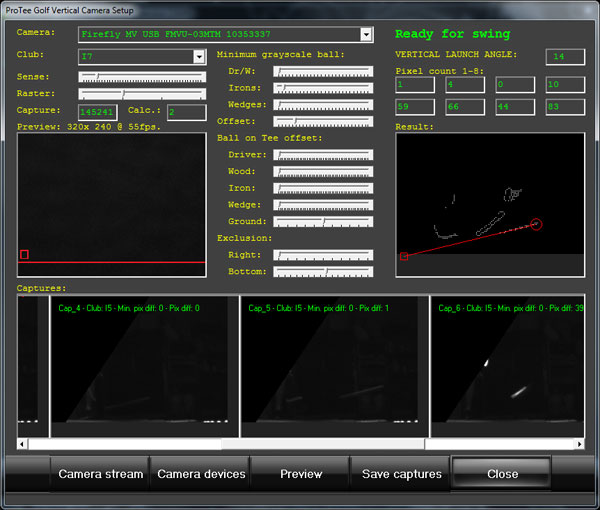
- Knowing that the ball streak grey scale color used in this example is between 25 and 40 we can set the irons slider to 20 and the offset slider to 25. This will filter out any other grey scale value that is not between 20 and 45.
Note: This filtering process will probably not remove all the other objects entirely, like club head and swinging arms. This is no problem. When the camera has been setup correctly it will always show the ball streak after your clubhead and arm swing.
- With the Right exclusion slider you can filter out the impact screen or any other noise that is coming from the right side of the camera image.
- With the Bottom exclusion slider you can filter out any noise (for example reflective turf) from the bottom of the camera image.
Make sure you hit a couple of test shots with the Iron 7 to verify the settings are correct!
Tip: The Ball on Tee offset sliders can be set to to make the starting point of the analysis higher. This value will be used when playing off the tee (first shot on the course).
0 Comments